Sharpening your wood carving tools will increase your enjoyment of carving. Here are common techniques for sharpening your wood carving tools. Sharper edges last longer and are more durable than dull ones. Sharp edges make your tool easier to use. Sharp edges make carving easier and ensure maximum cutting performance. Listed below are three common methods of sharpening wood carving tools. Read on to learn more. - Using a Sharpening Stone.
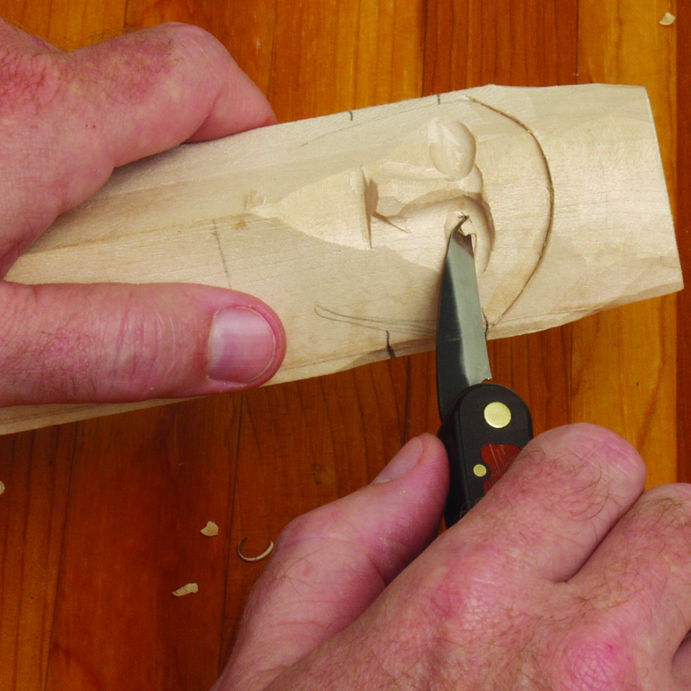
Sharp edges are a great way to enhance your carving experience
Sharp tools are not only better for carving, but tools with razor-sharp edges make it easier. Sharp tools are easier to use and allow for more control when carving. The smooth surface of a well-cut blade makes for a smooth cut. Sharp tools are essential for a successful carving project. To achieve best results, you should sharpen your carving tools frequently. Regular sharpening will ensure that your tools are sharp and can make carving much more enjoyable.
While sharp edges may increase the satisfaction of carving, they may cause blisters in the process. Wood's texture is natural and will not be smoothened with regular handling. However, calluses will eventually form from blisters. This process can be time-consuming and sometimes painful. If you notice blisters in your carving, try to change the way you hold your tools. It will take practice, but it is worth it.
When sharpening your knives, begin by using a sharpening kit and a fine-grained stone. Make sure to inspect the edge for damage. Chips around the edge will require more intensive grinding. An edge that is dull may need minimal grinding with a finer grinder. Finally, you can test the knife with a piece of paper or rope. If the knife has been dull for a while, you may not have to use a sharpening stone.
Common techniques for sharpening wooden carving tools
There are many options for sharpening wood carving instruments. There are oil, water, ceramic, and diamond sharpening stone options. Oil stones require oil to be applied on the stone's surface to prevent metal particles from embedding themselves in the surface. For sharpening carbide-wood carving tools, ceramic and diamond stones do not require oil. This article will address the most common methods for sharpening wood carving tools.
To remove the wire edge from a knife blade and to polish it, leather strops are useful. A leather strop is good for all tools. However, some carvers prefer a more textured one. Flat leather strops work well for straight tools as well as the outside edges of gouges. If you are serious about your work, you might consider a leather scrapper with grooves.
Bench chisels are traditionally sharpened at a 25-degree angle with a five-degree secondary bevel. Modern alloys may not work well with these angles, and could even crack. This means that you will need to raise your bevel angle. This will require more force, but you'll have less control. Block planes are sharpened at a twenty-degree angle.
Sharpening stones
You can sharpen your wood carving tools with a sharpening tool. The stone is made up of grit which is a crystalline mineral that is much harder than steel. It also has sharp edges. Most stones will need a lubricant in order to cut properly and prevent metal particles from embedding into it. After you have sharpened your tool to a sharp edge, it will be easier for it to cut wood with minimal resistance. The strop, which is typically made of leather, polishes the edge and removes the burr.
There are many types of sharpening stone on the market. There are oilstones that can be used for sharpening, waterstones and ceramic stones. The oil stones use oil as a lubricant to avoid fine metal particles from burying themselves in the stone surface. Both ceramic and diamond stones don't require any lubricants. They are both effective in sharpening carbide wood carving tools.
Sentima is an excellent example of a high-quality sharpening system. It comes in two sizes, a coarse one and a fine one. Both are made from corundum. This material is consistent in grain, which makes it easy to cut and gives it a smooth finish. The unique design makes it easy-to-clean. The sharpening system is made out of durable materials and will last years without losing quality.
FAQ
Where can I begin with woodworking
You can learn the most effective way to build furniture by actually building it. You'll need tools, and you'll have to make mistakes along the way, but if you keep at it, you'll eventually figure out what you're doing.
You should first choose the project you wish to complete. It could be something as simple as a box or as elaborate as a full-scale entertainment center. Once you have settled on a specific project, it is time to find a woodworker in your area who is experienced in such work. Ask them for suggestions on the tools you will need and where to buy them. Maybe you can ask the person if they know of anyone who does this sort of work.
What tools work best for me?
It is important to consider your needs and preferences when shopping for tools. What do you prefer: metal or plastic handles? What size nails and screws do you usually use? Are you comfortable with power tools, or would you rather use hand tools?
How do I organize my shop?
First, make sure you have a designated space for tools storage. Make sure your tools are clean and free of debris and dust so they can be used properly. Hang tools and accessories using pegboard hooks.
What would be your first step in woodworking?
Start with softwoods such as pine and poplar. You will feel more comfortable with these softwoods, so you can move onto hardwood.
How can I learn basic woodworking skills
A great way to start learning how to build furniture is by building a simple bench for yourself. This project can be done with any kind of wood that you have at home. You don't need to know which type of wood you should use. Instead, get some pine boards at Lowes or Home Depot. After you've built your bench, you'll want to sand off all the rough edges and finish it with a stain or varnish.
Where can I locate free woodworking plans
For free woodworking blueprints, you don’t need to read any magazines or buy any books. All you need to do is search Google. Search Google for "free woodworking" to see hundreds of sites that provide free plans.
How often should I get new supplies?
You'll probably have to replace some of your tools over time. If you're using hand tools, you'll need to sharpen them regularly. Power tools will require replacement parts every so often. You can spread your purchases over a number of months to avoid spending too much.
Statistics
- The U.S. Bureau of Labor Statistics (BLS) estimates that the number of jobs for woodworkers will decline by 4% between 2019 and 2029. (indeed.com)
- If your lumber isn't as dry as you would like when you purchase it (over 22% in Glen Huey's opinion…probably over 10-15% in my opinion), then it's a good idea to let it acclimate to your workshop for a couple of weeks. (woodandshop.com)
- The best-paid 10 percent make $76,000, while the lowest-paid 10 percent make $34,000. (zippia.com)
- Most woodworkers agree that lumber moisture needs to be under 10% for building furniture. (woodandshop.com)
External Links
How To
How to properly use your handsaw
To cut wood into pieces, a handsaw is used. Most common hand saws include circular saws (jigsaws), table saws and band saws. A handsaw is a tool made of metal or plastic that cuts material like wood, plastics, metals and others.
The best thing about a handsaw is the ability to make precise cuts at all angles and without needing adjustment. Sharpening them is easy, unlike with power tools. But there are disadvantages. They can be very heavy and bulky so it is important to take care when you transport them. If you are not familiar with how to use one you may injure yourself.
There are many ways you can hold a saw. You should always keep your hands far away from the blades while cutting. If you don't, you might get hurt. When holding the saw, you should place your fingers around the handle, keeping your thumb up near the top of the blade. This will ensure that you don't accidentally touch or scratch the blade.
You should not place anything underneath the wood you are cutting with a handsaw. The blade could slip if you do this. Always check the area where you want to cut before starting. Make sure no nails or screws are hidden beneath the wood.
Safety goggles should be worn when using a handsaw. They prevent dust from getting into your eyes, making it easier to see what you're doing. Safety glasses protect your head from flying debris.
Before you start working with a saw, it is important to learn how to use it safely. After that, practice until it becomes comfortable enough to start cutting. Once you've mastered the basics, you'll find that you can easily cut almost anything!