If you've ever wanted to try chip carving, then you've probably noticed that it can be a challenging task. There are many different techniques and styles you can try. But, which one is the best? What tools are necessary? This article will share my tricks and tips for carving chips and help you choose the right one for you. There are many key ingredients to successful chip carving, no matter how traditional your style.
Traditional
Chip carving can be considered one of the oldest forms in decorative woodcarving. It requires a straight-edged knife but a skew-ground or offset blade knife can also be used. Chip carving involves making many small triangular incisions in wood to create a pattern. This art form was developed simultaneously in several countries and dates back over 1000 years. Because of its widespread popularity, the designs were often so similar across nationalities that it was impossible to discern one from another.
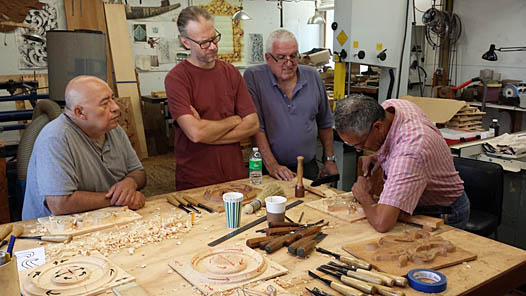
The skills needed to carve wood became more popular as the practice spread around the globe. Chip carving was an art form used to decorate furniture in Sweden. Schools were created to teach the art. The skills and knowledge of carvers from centuries ago have benefited modern chip carvers. Over the years, knowledge and experience was passed from apprentice to student. It is a process that lasts a lifetime and continues to this day.
Formulary free
If chip carving has been something you've wanted to try, this is the place for you. Murray Taylor's DVD shows you how to make freeform and geometric carvings. It is a wonderful introductory project, with lots of information. English and NTSC versions of the DVD are available. The DVD can be purchased in stereo or widescreen. Artisan Media Ltd. is owner of the DVD. The DVD can be downloaded in MP4 format on Windows and Mac computers.
Triangles, circles and lines are the basic shapes of geometric chip carving. This technique allows for endless shapes and patterns, and can also be used to combine various styles. This technique is also known by the free-form style of chip carving. No matter what shape your chips are, they will add beauty to any room. You can incorporate multiple techniques into one piece by free-form chip carving.
Techniques
Since centuries, chip carving has been a popular art form. These examples can be found all around the world. On paddles used for ceremonial purposes and boats in the South Pacific Islands, one example of chip-carving is found. Most likely, these carvings were made with pieces of bone and shells. However, some people report using shark teeth. This book shows how to create stunning designs using a variety chip carving techniques.
You can easily carve chip if your follow some basic steps. First, you need to learn how to carve the fine triangular shape. This pattern is easy to understand and easy to execute. To carve this pattern, you simply need to carve various triangles and repeat this process over again. However, chip carving doesn't have be boring. Variation of the triangles can give you a wide variety of patterns.
Tools
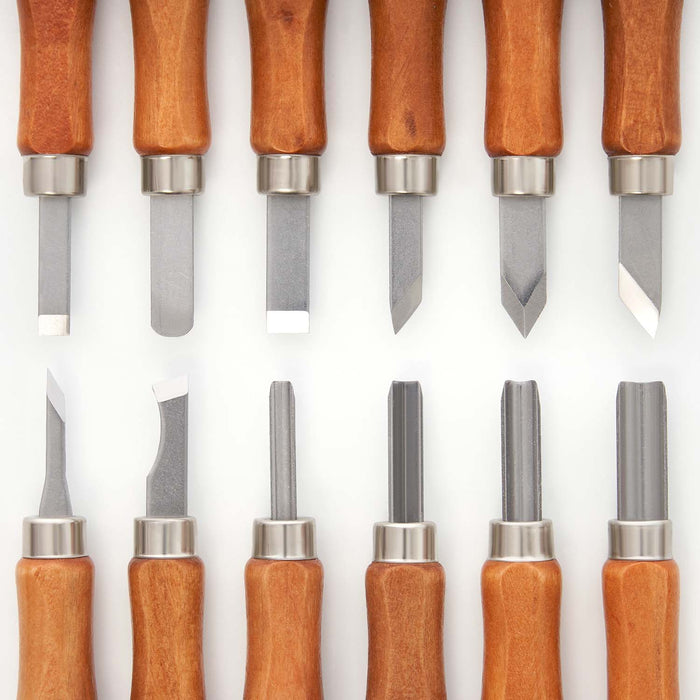
You can learn the basic steps of chip carving by attending a free online seminar from Lora S. Irish. She will teach you how use different carving tools and supplies such as a chip and stab knives, detail bench knife, and detail table knife. Irish also teaches you how to use different wood carving tools during this seminar. Choose from the below list to find the right tool that suits your needs. These tools can create simple shapes and designs. Or, you can work more intricately to create more intricate designs.
Special geometry is required for chip carving knives. It measures about one and a half inches in length with a narrow, curving back edge. This allows for precise incisions. You should also choose a point that is sharp and needle-sharp so that the edges meet perfectly. Chip carving knives are also made of stainless steel and come with a sharp tip. A chip carving knife should not be too sharp to cut a single piece of wood.
Getting started
When getting started with chip carving, you must first learn about its methodology. The method you choose will depend on the type and purpose of your carving. To ensure accuracy, it is important to be familiar with the following principles. The chip carving method involves making a pattern in the wood. Here are some steps to help you create your first chip-carving.
When using a chip carving knife, it is essential to sharpen it well. The blade of the chip carving knife will have bevels on each side, indicating that it is a primary chip carving knife. The sharpening stone is shaped like a diamond and can produce efficient edges. The stone should be placed at 10 degrees. The stone will both sharpen and shave the chip carving knives and tool simultaneously.
FAQ
How do you calculate woodworking prices?
The most important thing to remember when calculating costs for any project is to keep them as low as possible. Always ensure you are getting the best possible price for materials. It's also worth taking into account all the other factors that may affect the cost of your projects, such as time, skill level, and experience. Check out our guide on the average cost of common DIY projects to get an idea of how much you can spend on woodwork projects.
Which wooden items are very popular?
The most successful wooden items are made from sustainable wood.
Maple, cherry, mahogany walnut, teak, mahogany and maple are the most common woods for furniture.
These woods have beautiful grain patterns and colors. They are also very strong. They also last for many years if cared for properly.
Wooden furniture should always be painted first to protect against moisture damage. This covers all surfaces, drawers included, as well as doors and handles.
Choose a paint with water resistance if you want furniture to last as long possible.
Use a high-quality, oil-based primer and two coats of topcoat. Depending on the amount of wear, you may need several coats.
Spray cans and aerosol spray paints are not recommended. These products contain solvents that evaporate quickly and leave behind harmful fumes.
Do I need to be a genius to succeed in woodworking?
No. Woodworking does not require any special skills. To create stunning works of art, anyone can learn to use basic power tools.
What would be your first step in woodworking?
Start with softwoods, such as pine or poplar. These two are the easiest to master, then you can transition to hardwood.
Can you teach yourself woodworking?
The best way to learn anything is by doing. Woodworking takes practice, skill, patience and experience. Mastering any craft takes time.
To actually learn something is the best way. So start small and build on what you have learned from there.
Where to Buy Hardwood Lumber?
Home Depot has hardwood lumber for sale. You can find all types of wood products at Home Depot, such as flooring, cabinets and furniture.
You can also find a large selection of engineered hardwoods like Ipe (Araucaria Angustifolia), Brazilian Cherry, and Mahogany in their collection (Swietenia Macedonilla).
These woods can be found online by searching for "hardwood lumber" in Google.
Where do I start with woodworking?
It is best to actually build furniture to learn how to make it. While you will need tools and make mistakes, you will eventually master the art of building furniture.
Start by choosing a project you'd like to complete. You could make something as simple or complex as a box. Or you could build a whole entertainment center. After you have decided on a project to work on, contact a local woodworker that specializes in this type of work. Ask the local woodworker for help in deciding what tools and where to get them. Maybe you can ask the person if they know of anyone who does this sort of work.
Statistics
- In 2014, there were just over 237,000 jobs for all woodworkers, with other wood product manufacturing employing 23 percent; wood kitchen cabinets and countertop manufacturing employing 21 percent. (theartcareerproject.com)
- The best-paid 10 percent make $76,000, while the lowest-paid 10 percent make $34,000. (zippia.com)
- The U.S. Bureau of Labor Statistics (BLS) estimates that the number of jobs for woodworkers will decline by 4% between 2019 and 2029. (indeed.com)
- Most woodworkers agree that lumber moisture needs to be under 10% for building furniture. (woodandshop.com)
External Links
How To
How to stain hardwood
The process of staining wood involves the application of chemicals to the wood's surface, which causes it to change its color. This chemical reaction causes the wood to change from white to brownish red. Oak is the most common wood type for staining. However, you can also use other wood types.
There are many methods to apply stain to wood surfaces. You can mix the stain with a solvent, such as turpentine, and spray it onto the wood. Other methods use a solution of water and dye applied directly to the wood. It is possible to mix stain into varnishes and paints, making it part of the finishing coat.
Preparing your wood for staining is the first thing to do. Clean the wood to get rid of any grease, dirt or other substances that might be detrimental to the stain's application. Sanding smoothens scratches and rough spots. The next step is to determine the type of stain you would like to use. There are two main types of stain: non-penetrating and penetrating. Penetrating colors penetrate deeper into wood than those that are non-penetrating. This makes them more suitable for darker colors, such as mahogany. Penetrating stains are best paired with lighter colors, such as maple.
After choosing the type and application method you prefer, gather your tools. A paintbrush works well for applying stains because it allows you to spread the liquid evenly across the surface. After you're done painting, make sure to have some rags handy to remove any excess stain. If you plan to mix the stain yourself, make sure you have enough containers available to hold the different components of the mixture.
After you have prepared the materials, you can clean the area where you want to stain the wood. Clean the area with soap and warm water to get rid of dirt and grime. Wipe the entire piece of furniture with a rag dampened with clean water. You should remove any debris, especially if your plan is to stain darker wood.
Apply the stain next. The stain can be applied by spraying or brushing the stain onto one end of the furniture. Move slowly and carefully along the grain of your wood until you reach its opposite end. Keep the stain from dripping off the wood's surface. Before proceeding to the next step, let the stain dry thoroughly.
Apply a clear polyurethane sealant to protect the painted surface. Three coats of polyurethane sealing agent are required. Let the third coat dry overnight before you sand the final coat.